Making DIY wall string art can be a fun and easy way to add a personal touch to your home decor or make a fun gift! No matter how much experience you have, even a complete beginner can make string art!
String art is easy to make using nails and yarn, cords, or twine (embroidery thread doesn’t look as lovely as string). Kids and adults can enjoy making string art.
String art enjoyed a resurgence in the 1970s as a fun and easy way to create artwork. Beginners will enjoy working on this project because no special skills are required. If you select a shape with simple outlines, you can quickly achieve an impressive result.
DIY Wall String Art Supplies
Supplies for your DIY wall string art depend on your preferences. Below is a list of some things you can gather for this project. However, keep in mind that you can get creative with what supplies you choose.
One thing that I like to do before selecting my base wood, string or yarn, etc., is to look up examples online of what I want to make. It gives a better idea of my design choice on dark wood, painted wood (e.g., black vs. white, etc.,) and the look of different color string choices.
Supplies for DIY wall string art:
- Yarn, string, embroidery thread/embroidery string, etc. Yarn typically gives the most “full” effect of color.
- A piece of wood- I got mine at Hobby Lobby, but something similar is available on Amazon. The same wood is also available at Walmart. You could also use scrap boards if you are handy. You can also use inexpensive canvas for string art!
- This is a pattern for string art / simple shapes. You can use any pattern as an outline by searching on Google!
- Small Nails. You can use ¾” nails up to 1 ½” nails depending on the depth of your wood and how many times you want to be able to wrap your string.
- Small Hammer
- Scissors to cut string as needed
Steps for DIY Wall String Art
1. Print Your Design Image
I chose to make a selection of succulent string art to be displayed as a group on my wall.
So, I used google images to find pictures of succulent string art and printed them on blank paper as templates. To create a paper pattern, you can use an image that is personal and fun.
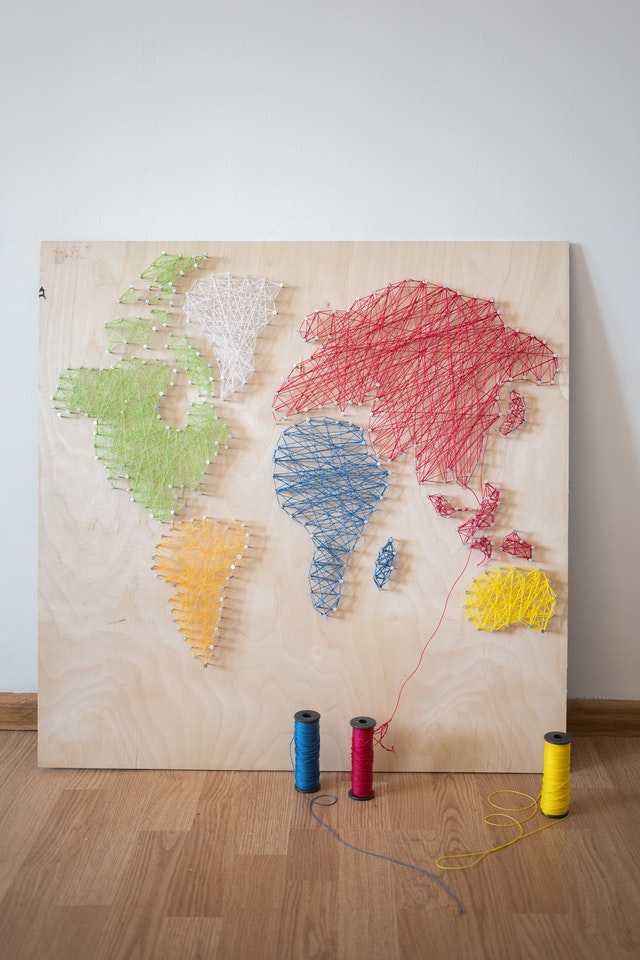
The next time I do this, I would love to use a shape template, make a string art map of a state, or even make a string art of a heart.
This project has no right or wrong way of doing it, making it fun. The possibilities are endless (and effortless).
Having an extra copy of your image will help later on. Picture it like a puzzle. If it is your first time, it helps visualize what you are doing.
2. Outline the shape with nails
Tape the pattern temporarily to the wood after positioning it on the wood.
Then lightly pound nails all around the pattern with the hammer. Nail them to the same depth and space them as evenly as possible.
Instead of holding the nail itself, have it in a clothespin instead of hitting your fingers with the hammer.
Pull the paper off after all the nails are in place to get a nice outline.
Your string art project will have a lovely outline/pattern by then. You can make nail and string art with just about any design you like. Make it unique to you!
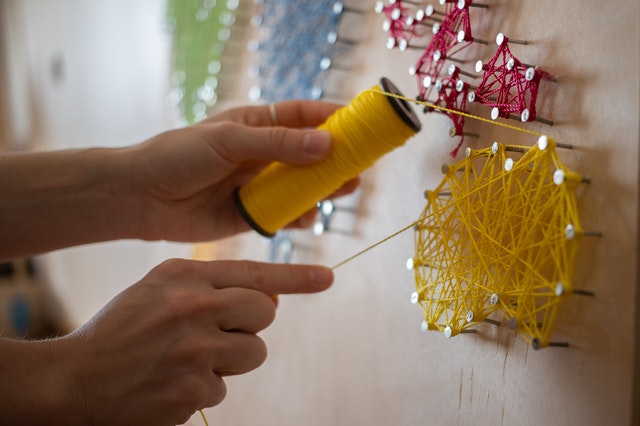
3. Using string, outline the shape.
Remove the paper pattern after you have outlined the nails. Next, tie the string to the first nail. When you pull it against the nails, using fewer strings will cause them to break.
After outlining the shape with string, start filling it in by crossing one end to the next. Alternate the lengths and order randomly as you go from left to right, top to bottom, and corner to corner. The best place to end your string is where you left a tail at the beginning. Tightly bind those ends and start the third bundle.
There are a lot of zigzags with the string. String art is a fun project that people of all skill levels can complete as no special skills are required. The project is suitable for both children and adults.
You should print a second copy of your image as a guide, as I mentioned above. It was beneficial in keeping our string from going beyond the borders.
4. Tie off loose strings
When the shape is filled to your liking, repeat this process until the ends are tied off. Trim the thread ends. You can also begin another string art project.
If you have left any excess string or loose ends after finishing each color, make sure you cut them off.
Thanks for participating in today’s project. Have you ever made any nail and string art? If you have some string art tips, please share!

Through thoughtful, research-informed content, Ian aims to make complex ideas accessible, practical, and engaging for curious readers seeking growth and understanding.
- Top 10 AI Tools for Time Management in 2025: Boost Productivity and Reclaim Your Time - October 10, 2025
- The Sixth Sense: Signs You’re More Intuitive Than You Think - August 28, 2023
- Unpacking the Phrase: The Deep Meaning of ‘She Distanced Herself to Save Herself - August 2, 2023